Showing posts with label drawing. Show all posts

Thursday, October 29, 2015

How to Self-Critique Your Art

Art Lesson Du Jour
Spend Less Time on the Ropes to Make Better Work
(dedicated to my champion students)

Fact: It's a simple truth that every painting and drawing are a series of corrections. 

When taking a jab at art, each mark is our best guess in relationship to the other marks we've made. It's the best mark we can make right then, at that moment in time. We make it knowing full well that it is likely to change, and that's ok. Later in the process we will know better. 

Problem: Panic, strong emotions, and harsh self-criticism will defeat the creative process. 


I often see students in a knock-down, drag-out with themselves when things aren't going well in a drawing or painting. Their critique of the work becomes a criticism of self. It's easy to allow the critical voices of one's insecurities or the nasty voices of others into your head. I've been there and done that as well. Trust me, when you let those guys talk, no constructive critique is going on! 

When I see my students hitting below the belt I say, "Hey, don't talk to my student that way," "Would I say that to you?" or "Would you say that to anyone else in your life?" Of course the answer is always "No!"

Panic too can creep in during frustrating moments. We live a fast paced life with instant gratification and the sheer time required to look and see properly can make an artist feel panic. The brain is constantly yelling, "This is taking too long." We feel certain that everyone else is figuring this stuff out with more agility and speed than we are.

All this self-doubt and emotional thinking clog up the creative process, so that's why it's important to have a strategy in place. 


Your brain without a plan.
Solutions: Click READ MORE  below for answers. 

Thursday, January 22, 2015

Etiquette for Artists and Their Nude Models

I've been asked recently for some guidelines for appropriate artist's behavior when working with models in a life drawing group. This is what I came up with.

Rules for Artists:

1. DO NOT touch the model, NO exceptions. No touching is a cardinal rule, not to be broken, ever. This rule also applies to artists when working with models privately for life drawing or photography sessions.

2. DO NOT photograph the model and do not ask the model if you can take a picture. A model may feel obligated to say yes because you are paying them, so it's best to not even ask. Make a separate appointment for photography because when an artist's model does photographic modeling, they make at least two to four times as much per hour as live models. Photographers/artists should have a model release specifically stating the intended use of the photographs.


3. DO NOT chat with the model when he/she is modeling. Conversation is distracting for the model and your fellow artists.


4. DO NOT make comments about the model's body.


5. DO NOT invade the model's personal space.  This includes sitting on the model stand any time the model is on it, five feet away is a good starting point.


6. DO NOT ask the model personal questions such as their last name, where they live, etc.


7. DO NOT ask the model out on a date.


8. DO NOT remove your clothes when the model does. I bring this up because it happened in one of my drawing classes when I was a college student.


9. DO NOT allow non-artists to wander through the room. 


Saturday, August 17, 2013

How to Draw and Paint Facial Features Part 4

Today, the mouth.

This is an ongoing series that is building up to a full portrait that I'm doing with the oil painting class I teach at Forstall Art Center in Birmingham, AL. If you are joining in for the first time for this post check out  Part 1, Part 2, and Part 3, to catch up.
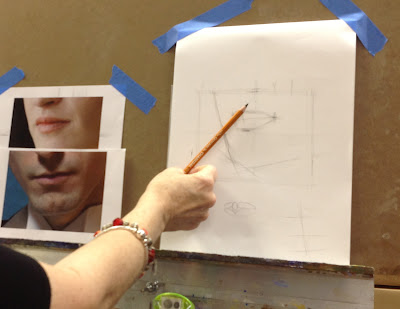
I begin by finding the mid-point and the quarter-mark for my image to correctly locate it on the page.
I'm checking angles to block in the overall width and height of the lips.
Click Read More to see important drawing concepts below the break.

Saturday, August 10, 2013

How to Draw and Paint Facial Features Part 3

The nose knows.

I did this drawing in class, while discussing the structure of the nose.
You may find the first 2 parts of this series about painting facial features, in which I demoed drawing and painting the eye,  here at Part 1, and Part 2.


This was one of several reference photos that I presented to my class. 
Key points to look for:
Click Read More to see the rest of the post. 

Saturday, May 4, 2013

How to Draw and Paint Facial Features - Part 1

It's all in the eyes.

I'm doing a series with the oil painting class that I teach at Forstall Art Center, in Birmingham, AL. We will be doing small studies of each feature of the face and then putting it all together at the end with a full portrait.

I printed out two good reference photos of eyes to share with my class. They will have the option of which one to paint. (Thanks Jeanine for the in progress shots!)

Is it fair to make your class paint images of your favorite models, even if those models happen to share the same DNA? I submit that it is. Moving on.

We talked a bit about the structure of the eye as in this except from Andrew Loomis' book. 

Since every artist needs to work on their drawing skills we are doing a full value study in charcoal or pencil. I started off in pencil and quickly switched to charcoal after figuring out that my students could see charcoal marks better. 

I started off the drawing with a block in, taking care to measure placement on the page, checking angles and proportions. This sketch is larger than life just for fun.

Next I added shadow shapes and worked on cross contour hatching. I think aobut the lines I'm making the same way I do the eventual brush strokes. Use directional strokes to describe form.


This is what I finished in class. It could definitely use more work. Read below drawing tips to help resolve any work.

Thursday, June 21, 2012

6 Ways to Improve Your Drawing and Get the Lead Out

Improving Your Drawings Will Improve Your Paintings
I just finished teaching a four session drawing class so I thought I'd share a few thoughts about drawing.
"Let me not think of my work only as a stepping stone to something else. And if it is, let me become fascinated with the shape of the stone." ~Ze Frank


This is from Ze Frank's inspirational video called "An Invocation for Beginnings", a wonderfully artistic call of encouragement to get out of a rut. Don't get stuck between one and zero. (warning it does contain a curse word or two)

1. Drawing Ergonomics
These are very simple things that will make drawing accurately easier.
~Arrange your body square to the drawing board/canvas and the subject, so that you can see the subject and your drawing in the same view.
~Set up the drawing board parallel to the subject.
~Set up the easel as close to vertical as possible.
~Move only your eyes, arm and hand.
Amanda in Sepia, 12x9, oil on panel 
2. Understand and Incorporate the Concept of Picture Planes
~Imagine a sheet of glass with a grid on it between you and the thing you are drawing.
~Think jigsaw puzzle, some puzzle shapes are the negative space, some are the objects, some are the light on the object, some are the shadows on the subject or cast by the subject.
~Think continents on a map, sometimes you are drawing the water, sometimes the land masses.
~ Drawing is transferring this image of that flattened picture plane onto the picture plane of the paper.

Amy Reading, oil sketch from life drawing group, 12x9
3. Sighting and Proportion
~Think of the sides of your drawing paper as vertical, and the top and bottom as horizontal.
~Measure angles in what you are viewing as compared to horizontal and vertical.
~Establish a basic unit of measurement, one head length for example.
~Compare this measurement to the height and width of your subject.

4. Learn the Value of Self-Critique. (It's NOT the same thing as Self-Judgment)
~Ask yourself how the shape/angle/line you have drawn differs from your observation of the subject.
~As you continue your drawing do not just add details to the drawing but continually correct shapes/angles/lines, etc.
~Nothing is locked in until the drawing is complete.
Travis in Leather, 12x9, oil on panel
5. Be Stubborn and Stick It Out!
~Recognize that there is a ready to throw in the towel point in every drawing. There is a very nasty inner voice telling us it is impossible, understand that the inner voice is wrong and press on!
~Calm the inner voice by ignoring it, and looking only at angles, lines, proportions, that's what drawing is all about.
~Be kind to yourself.

“Let me think about the people who I care about the most, and when they fail, or disappoint me, I still love them, I still give them chances, and I still see the best in them. Let me extend that generosity to myself.”   ~Ze Frank

Kelsey, oil sketch from life drawing group, 9x12
6. Draw from Life as Much as Possible
~One last thing- resist the call of the couch and find a life drawing group in your area.
~Draw from still life set ups and nature.

All the oil sketches I've included were done at my local life drawing group. They are one hour total time with the model. It is always an adrenaline rush to get something anywhere near complete.

I am ALWAYS out of my comfort zone at life drawing because of the time element but I learn so much from the experience that helps my more sustained work. Outside the comfort zone is where true learning takes place so remember to linger!

You may enjoy a post I did about a David Kassan Workshop I took in late 2011.
Or other posts I've done about drawing.

This post is taken from one on my monthly newsletter's Teaching Spotlight Column. Sign up in the form below.


Tuesday, February 21, 2012

Painting a Head Study, Part 2

In the second session with my oil painting class, I demonstrated premixing a palette that we'd be using for the flesh tones, the background and the hair. If you missed it, here's Part 1.
I'm a firm believer in premixing strings of color, it takes a little patience, but I think it pays off when you get into it.
I started with the background and worked forward, and in adjacent areas so that I could have good control of the edges.

I store my paint in a Masterson plastic palette with a cover. It's then wrapped in a trash bag and stored in the freezer. The paint will still be usable at our next class so all the mixing time and paint will not be wasted.

My understanding is that a home freezer doesn't get cold enough to actually freeze the paint but slows down the oxidation process which is what actually dries oil paint.

There is debate among artists about this but it makes sense to me. What everyone agrees with is never freeze your brushes or a painting! The cold will adversely affect your painting surface, the wood in the brushes, etc.

Be prepared to have your family complain about losing freezer space, a mini turf war of sorts. Especially when you have multiple palettes in there. (I'm up to three). The war generally fades to a rumble if you have your defense prepared.  Go on long enough about saving time and money and you shall prevail!

Monday, February 13, 2012

Painting a Head Sudy, Part 1

I've started a new project with my Tuesday class. We are doing a head study working from a photo. This is the first time I've done this project with them, so it's kind of an experiment.

We are all working from the same photo, one of mine. I chose a mostly full front view of the face. It is classic Rembrandt lighting, in which there is a triangular patch of light on the shadowed side of the face.
I printed an 8x10 grid on a transparency to lay over the image. The grid dissects the image into thirds. This helps with the drawing, placement of the head on the canvas and of the features on the head. I think it is also helpful in learning to draw.

It helps to start to see things flattened and in relationship to each other. Drawing the individual shapes within one square helps to see it primarily as shapes. This shift in the way of looking at something is very crucial in learning to draw.

We first drew the image in a graphite pencil.
Next we redrew it with a Faber Castell permanent sepia pen.
I noticed (after it was drawn in the pen) that I had the right side of her face too wide, but that's okay. Oil paint is very forgiving and the marks will be covered eventually with paint. 

The important thing, listen up here my students, is to make the correction as soon as you see it! It's much better to have caught and corrected it at this stage than later after I had perfectly rendered the ear.
Next I did a rub out using Burnt Umber thinned a bit with linseed oil, mineral spirits and res-n-gel (to speed the drying). I painted in a few of the darkest areas.

My intention was for everyone to get to this stage in the first of four 3 hour classes dedicated to this project. None of the students got to this point. I spent about two hours additional after class, getting  this far. Most of them had their drawings well along. Next time I will know to leave two class sessions for this stage of the project.

You  may recognize this model from another painting. I'm excited to be painting her again.
"Cardea", 16x16, oil on canvas over panel.
She was part of my Elements series.

Here is a post I did about under painting with Gamblin Fastmatte,
And another about this under painting technique, "Aye, There's the Rub".

Friday, January 27, 2012

David Kassan Workshop

I was lucky enough to go to a three day David Kassan Drawing Workshop in early December 2011 at the Townsend Atelier in Chattanooga TN.

The weekend started with a free public drawing demo by David at the Hunter Museum of Art on Thursday night.
Artist Mia Bergeron helping David set up.
David with his initial block in using pan pastels.
David uses binoculars for seeing detail and true shapes. I've seen demos of his using them before on line and I always thought they would be used at the end for details but they are actually used early on, to see areas of dark and light more accurately.
Here he is using a mahl stick with a hook on the end that can rest on the top of the drawing when he isn't using it.
Alia El-Bermani and Cindy Procious enjoying the demo.
David's finished drawing from the demo which was about three hours long. You could tell he really wanted to work on it longer. He called it "cursory," but of course we were all impressed.
Early Friday morning at the Atelier, David spent a bit of time setting up the model, experimenting with a dark or light background and adjusting the light. The class was structured around him demonstrating for three hours in the morning and then after a lunch break the class drew for four hours. 
In this close-up you can see how he outlines shadow shapes to define them and hatches in layers, building up the values.
 
There were 14 people in the class, David arranged the easels so that everyone had  good view of the model and then we drew numbers, with the lower numbers choosing their easels first. I was number 13 but still had an interesting view,  although not one I might have chosen if I'd gotten a smaller number- a straight profile.
From my spot, you can see the light set up and my first clunky block in with the pan pastels. We were working on a heavy, smooth, medium gray card stock paper.
The pan pastels are scrubbed into the paper with a paper towel, so we were building up layer upon layer of black charcoal pencils of varying hardness and white charcoal pencil. Using very sharp pencils, "Sharp pencils make sharp drawings".
In this one you can see the eraser marks, where an eraser is used as a drawing implement. Even though we were working on toned paper every inch of the paper is covered in charcoal. Some schools of thought leave the toned paper as a mid-value but David actually mixes the white and black charcoal to create a full range of gray scale.
My finished drawing. About 11 or 12 hours total.
Here are a couple close-ups. It is a very subtle cross hatching technique. I could never have seen this kind of detail with out the binoculars. I did have a tough time with them the first day but kind of adjusted to them by the second day.
One of the best parts of the weekend was reuniting with a few of my WPW friends! We worked hard, ate well, socialized plenty and slept little. A perfect storm.
Me, Cindy Procious, David, Mia Bergeron, Alia El-Bermani
Alia with her gorgeous finished drawing.
Mia with her fabulous finished drawing.
The Townsend Atelier was a great place to have a workshop like this. Stan and Peggy Townsend were very organized and did everything possible to make us feel welcome. They have a busy class schedule, painting, drawing and sculpture, and an interesting assortment of fine art materials, check it out!

You can sign-up to receive Townsend Atelier emails on this page. Talks are in the works... looks like I will be teaching a two-day painting workshop later this year. I will keep you posted.

I highly recommend David Kassan's workshops. He has a DVD of his drawing method so if you don't get as lucky as we were to have him in driving distance check it out. David is a generous teacher and freely answered questions about his work. I learned a lot about his method with charcoal and about capturing one area with absolute accuracy, using that area as a map legend to base the rest of the drawing on. 


Thursday, March 10, 2011

"Oracle" appears in American Artist's Drawing Magazine, Winter 2011!

 
(On the cover, "Eight Falling on Thirty" by Ian Ingram)

My drawing is included in an article titled Forming the Figure.

"Whether traditional or contemporary, realistic or abstract, an artist's choices concerning the model, pose, and form of a figure are guided by expressive purposes." 

by Ken Proctor

“Oracle” 22x30  Charcoal and Pastel 

Here is an excerpt:

"In our mythologized and ordinary era, how is it possible to revive a myth? To engage the modern viewer, Terry Strickland follows a proven strategy: Artist's as far back as the Renaissance, set historical and biblical scenes in present-day concepts, with the figures wearing contemporary clothing. Defying stereotypes about gypsyish fortunetellers, Strickland’s Oracle appears to be an ordinary, modern woman.

Clothing is a powerful symbol for an artist to characterize a figure.  A suit speaks of facts, a gown of glamor. But hidden or forbidden truths, as an oracle might deliver, come not from the exterior but from inspiration within, beyond everyday experience. To peel away the the outer, workaday world, Strickland posed her model stripped to a slip.  Symbolically stripping enables revelation. Like her slip, the oracle's skin is light and clear. Dark hair, stark shadows, and a dramatic lighting heighten her fair skin. The combined effect, rendered in a straightforward, realistic style, transforms an ordinary woman into an archetypal virgin-priestess.


Although it stretches the bounds of a contemporary setting, the oil lamp is plausible, familiar. Light is a powerful symbol-light shining out of darkness suggests mystical revelation. And who would seek the truth with a light bulb?  Fire is primal.  It's flickering fragility of fire suggests the tenuous nature of fortune and fate. Glass, the impossibly mysterious product of fire-hard as a rock yet transparent, with it's inscrutable lens effect. No wonder fortunes manifest in crystal balls. 

Whereas layers of meaning in collage depend on overlapping real materials, Strickland created a double meaning through conventional realism and a pose carefully constructed to occupy two layers of space. In a dramatically Baroque gesture, the oracle thrusts out her lamp. She appears to hold it with smoke to her nose and flame to her heart, calling to mind the legend of the Oracle of Delphi, which postulates that priestesses breathed intoxicating vapors to induce a trance. The lamp seems to project beyond the picture plane; the mesmerizing flame--the light of mystical truth--hovers right before our eyes."


Pretty cool, huh? The article in it's entirety is very thought provoking, siting Ingre, Degas, Chagall, Kokoschika, Modigliani, Diebenkorn, de Kooning, and Therese Bauer.

He put into words how I felt about the piece so well, concepts that for me were not so much conscious thoughts but feelings, and to know those ideas were experienced by a thoughtful and receptive viewer is wonderful for me!

The magazine is available at book stores now and through the website.

Here are other posts I've done about "Oracle".

LinkWithin

Related Posts Plugin for WordPress, Blogger...